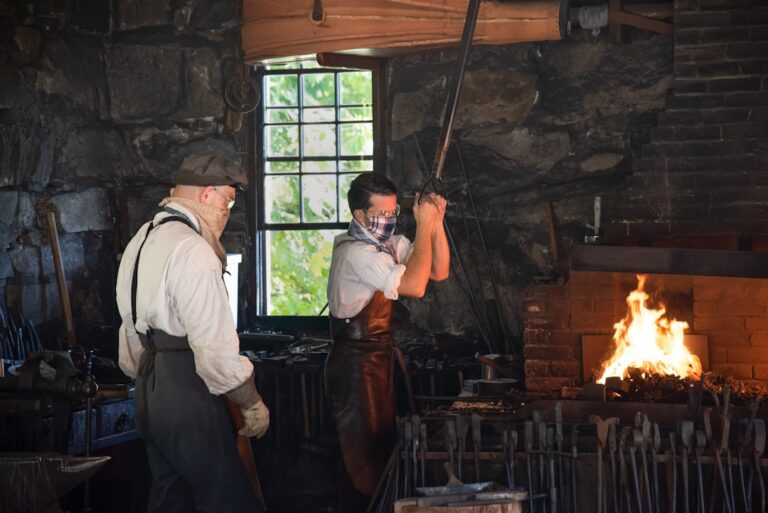
Blacksmithing is an ancient craft that has evolved over centuries, yet its core principles remain unchanged. At its heart, blacksmithing involves heating metal until it becomes malleable and then shaping it into various forms using tools and techniques that have been passed down through generations. I find it fascinating how this age-old practice combines artistry with practicality, allowing me to create functional items that also possess aesthetic value. The allure of blacksmithing lies not only in the physical act of forging metal but also in the deep connection to history and tradition that it fosters.
As I delve deeper into the world of blacksmithing, I realize that understanding the properties of different metals is crucial. Each type of metal reacts differently to heat and pressure, which influences how I approach my projects. For instance, wrought iron is known for its ductility and strength, making it ideal for decorative work, while steel is often preferred for tools due to its hardness and durability. By familiarizing myself with these materials, I can make informed decisions about which metal to use for specific applications, ultimately enhancing the quality of my work.
For those looking to deepen their understanding of blacksmithing techniques, a valuable resource can be found in the article titled “Mastering Medieval Blacksmithing Techniques.” This piece provides insights into traditional methods that can enhance your skills and knowledge as you embark on your blacksmithing journey. To explore this informative article, visit Mastering Medieval Blacksmithing Techniques.
Key Takeaways
- Grasp fundamental blacksmithing concepts before starting practical work.
- Establish a safe and efficient workspace tailored for blacksmithing activities.
- Acquire and familiarize yourself with essential tools and equipment.
- Practice core metalworking techniques to build foundational skills.
- Engage with communities and pursue ongoing education to enhance expertise.
Setting Up Your Blacksmithing Workspace
Creating an effective blacksmithing workspace is essential for both safety and productivity. I began by selecting a suitable location, ideally outdoors or in a well-ventilated area, as the process generates significant heat and smoke. A sturdy workbench is a must-have; it provides a stable surface for my projects and keeps my tools organized. I also made sure to have a reliable anvil, as it serves as the primary surface for shaping hot metal. The right setup not only enhances my efficiency but also ensures that I can work comfortably for extended periods.
Safety is paramount in blacksmithing, so I took the time to equip my workspace with essential safety gear. This includes heat-resistant gloves, safety goggles, and a sturdy apron to protect myself from sparks and hot metal. Additionally, I made sure to have a fire extinguisher nearby, as working with fire always carries inherent risks. By prioritizing safety in my workspace, I can focus on honing my skills without unnecessary distractions or hazards.
Essential Blacksmithing Tools and Equipment

As I embarked on my blacksmithing journey, I quickly learned that having the right tools is crucial for success. The foundational tools include a forge, an anvil, and hammers. The forge is where I heat the metal, and I opted for a propane forge for its efficiency and ease of use. The anvil serves as my primary shaping surface, while hammers come in various shapes and sizes to achieve different effects on the metal. Each tool plays a specific role in the blacksmithing process, and understanding their functions has been instrumental in my development.
In addition to these essentials, I discovered that having a variety of tongs is invaluable. Tongs allow me to grip hot metal securely without burning my hands, and different designs cater to various shapes and sizes of workpieces. Other tools like chisels, punches, and files also play significant roles in refining my projects. As I continue to expand my collection of tools, I find that each addition enhances my capabilities and opens up new possibilities for creativity.
Learning the Fundamentals of Metalworking
To truly excel in blacksmithing, I realized that mastering the fundamentals of metalworking is essential. This includes understanding how to heat metal properly, how to manipulate it while it’s hot, and how to cool it effectively.
The heating process is critical; if the metal isn’t heated to the right temperature, it won’t become malleable enough for shaping.
I’ve learned to recognize the color changes in the metal as it heats up—starting from a dull red to bright orange—indicating that it’s ready for forging.
Once the metal is at the right temperature, the next step involves striking it with precision. This requires not only strength but also technique; each blow must be deliberate and controlled to achieve the desired shape without damaging the material. Cooling techniques are equally important; quenching in water or oil can harden the metal but must be done carefully to avoid cracking. By practicing these fundamentals consistently, I’ve developed a deeper appreciation for the intricacies of metalworking and how they contribute to successful blacksmithing.
If you’re looking to deepen your understanding of blacksmithing techniques, you might find it helpful to explore the article on the art of the blacksmith’s maker’s mark. This resource complements “The Beginner Blacksmith Roadmap That Actually Works” by providing insights into the significance of personal branding in your blacksmithing journey. Discover how to create a unique identity for your work by visiting the art of the blacksmith’s maker’s mark.
Practicing Basic Blacksmithing Techniques
With a solid understanding of the fundamentals under my belt, I began practicing basic blacksmithing techniques that would serve as the foundation for more complex projects. One of the first techniques I focused on was drawing out, which involves elongating a piece of metal by hammering it at one end while keeping the other end stationary. This technique is essential for creating hooks or handles and has helped me develop my hammer control.
Another fundamental technique I’ve practiced is bending, which allows me to create curves and angles in my workpieces. By heating the metal to a workable temperature and applying pressure at specific points, I can achieve various shapes that add character to my projects. Additionally, I’ve explored techniques like twisting and punching holes in metal, which further expand my creative possibilities. Each practice session not only improves my skills but also builds my confidence as I see tangible progress in my abilities.
If you’re interested in enhancing your blacksmithing skills beyond the basics outlined in The Beginner Blacksmith Roadmap That Actually Works, you might find value in exploring the techniques discussed in a related article. This piece delves into the historical aspects of blacksmithing, specifically focusing on the craftsmanship involved in medieval forges. You can read more about it in the article titled Forging Ahead: The Art of Medieval Forges, which provides insights that can inspire your own forging journey.
Creating Your First Blacksmithing Projects
After honing my skills through practice, I felt ready to tackle my first blacksmithing projects. I started with simple items like hooks and small decorative pieces, which allowed me to apply what I’d learned without overwhelming myself.
Creating a basic hook was particularly rewarding; it involved drawing out the metal, bending it into shape, and finishing it with a smooth surface.
The sense of accomplishment I felt upon completing my first project was exhilarating and motivated me to take on more challenging tasks.
As I gained confidence, I decided to experiment with more intricate designs. One project that stands out was crafting a small decorative knife. This required not only shaping the blade but also creating a handle that was both functional and aesthetically pleasing. The process taught me valuable lessons about precision and attention to detail, as even minor imperfections could affect the overall quality of the piece. Each project serves as a stepping stone in my blacksmithing journey, pushing me to refine my techniques and explore new creative avenues.
Joining a Blacksmithing Community or Guild
Recognizing the value of community in my blacksmithing journey, I sought out local blacksmithing groups and guilds where I could connect with fellow enthusiasts. Joining a community has been incredibly enriching; it provides opportunities for collaboration, knowledge sharing, and inspiration from others who share my passion. Engaging with experienced blacksmiths has allowed me to learn new techniques and gain insights that I might not have discovered on my own.
Participating in workshops and group projects has also been a highlight of my experience within the community. These events foster camaraderie among members while providing hands-on learning opportunities that enhance our skills collectively. The support and encouragement from fellow blacksmiths have been invaluable as I navigate challenges and celebrate successes in my craft. Being part of this community has not only deepened my understanding of blacksmithing but has also forged lasting friendships with like-minded individuals.
Continuing Your Blacksmithing Education and Skill Development
As I reflect on my journey thus far, I recognize that blacksmithing is a lifelong learning process. To continue developing my skills, I’ve committed to ongoing education through various avenues. Online resources such as tutorials and forums have proven beneficial for expanding my knowledge base beyond what I’ve learned in person. Additionally, attending workshops led by master blacksmiths has provided me with unique insights into advanced techniques that challenge me creatively.
I also make it a point to set personal goals for skill development. Whether it’s mastering a specific technique or completing a more complex project, having clear objectives keeps me motivated and focused on improvement. As I continue to explore new styles and methods within blacksmithing, I’m excited about the endless possibilities that lie ahead. Each step in this journey not only enhances my craftsmanship but also deepens my appreciation for this timeless art form.
FAQs
What basic tools do I need to start blacksmithing as a beginner?
To begin blacksmithing, you typically need an anvil, a hammer, a forge (such as a coal or gas forge), tongs, and safety equipment like gloves and eye protection. These essential tools allow you to heat, shape, and handle metal safely and effectively.
How do I safely set up a beginner blacksmithing workspace?
A safe blacksmithing workspace should be well-ventilated, have a non-flammable surface, and be free of clutter. Ensure you have proper lighting, a sturdy workbench, and easy access to water or a fire extinguisher for emergencies. Wearing protective gear and maintaining a clean area are crucial for safety.
What are the first skills a beginner blacksmith should learn?
Beginners should start by learning how to heat metal properly, basic hammering techniques, drawing out metal, tapering, and creating simple shapes like hooks or nails. Understanding how to control temperature and metal behavior is fundamental before moving on to more complex projects.
How long does it typically take to become proficient in blacksmithing?
Proficiency in blacksmithing varies depending on practice frequency and instruction quality. Generally, with consistent practice, beginners can expect to develop basic skills within a few months, while mastery of advanced techniques may take several years.
Are there recommended resources or courses for beginner blacksmiths?
Yes, many beginners benefit from online tutorials, instructional videos, and local blacksmithing classes or workshops. Books on blacksmithing basics and joining blacksmithing communities or forums can also provide valuable guidance and support.